
I love to paint miniatures. I started doing it about five years ago because I needed a hobby that wasn’t on the computer and didn’t cost ammo money. I also enjoy various miniature war games ever since Howard Tayler and Alan Bahr introduced me to Warmachine a long time ago. But I’m into it for the painting way more than the gaming. Miniature painting is relaxing. I put an audiobook or a tv show playing in the background, and it is a great way to unwind for a few hours.
I’m not the best painter, but I’m pretty good. If you want to see examples of the best mini painters go to www.coolminiornot.com and check out the top rated painters in their gallery. Personally, I like to spend a couple hours on one mini, tops, and then I want to move onto the next one, so I I’m not really wired to put in the time necessary on one mini to make it that good. I get bored. Instead I like to watch the piles accumulate.

Since I usually post my Work In Progress minis on Facebook I’ve been having a lot of people asking me questions. So this is going to be the big tutorial post for everything you need to know to get started with basic mini painting. And if you search, there are a lot of other tutorials out there, from painters way better than me, and then there are higher level tutorials that go into great depth just about particular techniques. Every little thing I talk about, somebody else has a big article about just that step.
SUPPLIES
Miniatures. This is easy. If you don’t have a cool Local Game Store (always support your LGS!) go to www.frpgames.com or www.miniaturesmarket.com and pick whatever you think looks fun. Warning. This is addictive and these little buggers can get expensive. Always check the clearance bin. Especially when you are learning, it is cheaper to learn on something that you snagged for 75% off. If you want something really cheap to learn and practice on, look up Reaper’s Bones. They are a soft plastic, but they paint up just fine. (also Bones are made out of a material that doesn’t require priming, so when you are starting out you can skip that step and just get to base coating)
Glue. Most minis that come in any sort of dynamic post are going to have to be molded in pieces. So you’re going to have to put them together. I’ve tried every sort of glue there is, but my absolute favorite for toughness and ease to work with is Loctite Gel Super Glue. It doesn’t run everywhere so it doesn’t make a mess, and a little bit of this stuff goes a long way.
A Hobby Knife. This is related to putting them together. For metal or plastic minis, you are going to get little mold spues stuck to them or bits of flashing. Mold lines can be hard to notice on bare metal, but look like crap when you start painting. Just gently shave those off. And be careful. Every single one of us who does this has cut our fingers at some point.
Primer. There is brush on primer and spray primer. I like spray primer, but all that matters is that you put down a coat of something onto that bare metal so that paint will stick to it. I’ve used all sorts of different brands of spray primer, and I usually just use the regular old Krylon stuff from Wal-Mart.
Paint. Available in the same places you get minis. There are a bunch of different brands and a million colors. I mostly use Vallejo and Reaper brand paints, but there are lots of others to choose from too. You don’t need tons to start. Get some white, black, and whatever colors you think would look good on those first test minis you bought. You will accumulate more colors as you go.
In addition, one of those paints will be labeled “Wash”. Get at least a brown or a black one. A simple Wash can make even a basic humble simply painted mini look better. I also use a lot of P3 Armor Wash. Flesh Wash is amazing too. You’ll see why later.
Brushes. Available from the same places you got minis. Since you are just starting out, you don’t need to go fancy. Some good brushes for cheap are the Army Painter or Reaper brands. Once you are good and have learned how to take care of your brushes, get Windsor Newtons. I’d recommend having a big beater for base coats and washes, and then a nice pointy medium sized one for most work, and a little pointy guy for details. For dry brushing, use a crappy brush, because that will screw up your nice pointy ones fast.
Pallet and something to rinse brushes in. You can use any old piece of plastic to stick paint on. I live somewhere with no humidity so paint dries really fast. I like to use what’s called a wet pallet. Get a cheap piece of Tupperware (mine is a leftover lunch meat container), stick a sponge in it. Wet the sponge. Put a piece of wax paper on top of the sponge and stick your paint on that. Moisture will seep through the wax paper and keep your paint from drying out. If you’re walking away for a bit, you can even put the lid on to keep your paint wet longer.
But don’t leave the lid on long term, because you will get mold. And even then, when your sponge starts looking or smelling a little funny, go wash it. The best way to keep a brush pointy as you go is by licking it, and that’s just gross if your wet pallet is growing spores.
Matte Finish: I like to spray my minis with a matte finish when I’m all done. It takes away the shine so they look a little more natural to the eye, and it also protects them from chipping if you are using them for war gaming.
A good light. Seriously, get a good light. I like an LED Ott light. But to start any little table lamp will work.
Some people like to use magnifiers for detail work, but I don’t. I’m supposed to wear reading glasses, but I never do because I find them annoying. I’ve found the best way to check your detail work is to take a photo on your phone, blow it up huge, and check the detail you just did to see how much it sucks.
ASSEMBLY
This part is important. ALWAYS WASH YOUR MINIS IN SOAPY WATER FIRST. Don’t just take a mini out of the package and start priming. Because of the manufacturing process there will be material on them that paint won’t want to stick to. I think this has something to do with how they release from the molds. So I’ll drop them in a thing of warm soapy water and hit them with a tooth brush real fast. Then make sure they dry fully before gluing, otherwise the glue won’t stick, and they will fall apart at the moment best designed to piss you off.
Lay out your parts and see how they fit together. Take that hobby knife and trim off excess flash or shave off any little bits that don’t fit right. I like to use a little bit of Green Stuff putty at this point to fill in any gaps, but for most minis that isn’t really necessary.
When you are gluing them together, remember a little bit of super glue goes a long way. If there is excess wipe it off, because other wise glue looks like crap when you paint over it. If you glue something, and it doesn’t take and you need to glue it or again, or you accidentally knock an arm off and have to glue it back on later, this is IMPORTANT, always scrape out the old dry glue first. Don’t try to put new glue on top of old glue, because the one thing that super glue won’t bond to is already crystalized super glue.
EDIT to add this picture, because somebody who wasn’t familiar with minis asked about how big they are. Pretty flippin’ tiny. Which is what makes it fun. 🙂

BASING
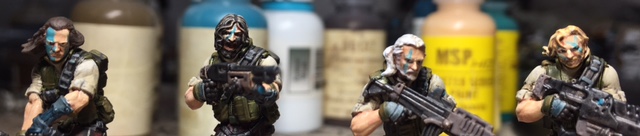
This is a simple, quick and easy step that will make any miniatures look better. For consistency I should have took pics of the Scots I used for the rest of this tutorial, but I forgot, so I quickly did up these space marine looking dudes instead.
Some people like to paint the mini, and then attach it to the base later. That lets you get up into the lower recesses better. But personally I like to attach them to the base, and then paint the whole thing.
Either way, you can still decorate your bases, because a plain base is boring. You can use sand, kitty litter, whatever. Over the years I’ve accumulated dozens of different basing materials.
Some bases are already slotted to put the tab under the Mini’s feet in. Others you can cut the plastic to make a hole for that tab. (since this is a basic tutorial, I’m not getting into pinning, but if you’ve got a Dremel, basically you can attach anything to anything). Super glue your mini to the base.
If your base still has a visible hole in it, the easiest way to fill that in is just put some tape over it before you put your basing material down.

Then put a coat of cheap old grade school white glue on the base wherever you want sand to go. I just use a cheap crappy brush for this.

Sprinkle your basing material on the glue. At this point feel free to move stuff around so it looks good (it looks weird if you cover their feet, unless you are trying to make it look like they are slogging through mud)

Let the glue dry. And then go back and put a second watery coat of white glue over the top of the gravel. That will seal it down. And if you are spray priming later, that will seal this stuff down good and hard. On that note, make sure you let that glue dry before you spray prime, otherwise it makes a mess. Also dust off any excess sand from the mini’s body before you prime.

Boom. Simple, easy. Takes a few minutes, and looks way better than a boring plain black base.
PRIMING
If you are spray priming, do it outside or in your garage with a bunch of air flow. From personal experience, if you live someplace cold with no humidity like I do, don’t try to spray prime if it is below freezing because the primer tends to freeze into clumps rather than going on smooth. If you spray prime a lot you are going to make a mess. I’ve got a spray area in my garage for my air brush, and that whole area is covered in over spray.
You can prime in whatever color you want, and there are pros and cons and a different final look with white, black, grey, and even what’s called Zenithal, where you prime it black first, and then a squirt of white from directly above to help with your highlights. (and if you try that, make sure you still put enough white that it is a smooth coat, because if you just dust it, then the white primer will dry bumpy, giving your mini a rough appearance). I use all of them depending on what colors I’m planning on putting on top.
A note on primer. LIGHT COATS. Don’t just glob it on there because then you’ve filled in all the little detail cracks with spray primer. After you prime, when you bring the mini in, if there are any bare metal spots you missed (usually arm pits, between legs, etc) take a brush and hit that spot with some primer or paint the same color as your spray primer.
Let your spray primer set for at least 24, preferably 48 hours, before painting. This will make it tougher and prevent chipping. I usually prime a whole bunch of stuff at once and have it ready to go for whenever I’ve got time to paint.
THE BRAVEHEART CHALLENGE
For this tutorial I wanted to show how to do a good, but straight forward and relatively fast paint job. Lots of people just want to have decent looking minis to put on the table, because they’re in it for the gaming rather than the painting. So I wanted to paint something with step by step photos so those guys could see how far they’d want to get before calling it good.
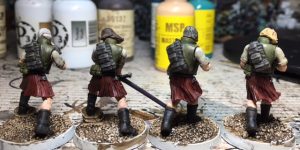
I had these four Scots from Infinity already based and primed, so I decided to try and see if I could get them mostly painted in the time it took to stream Braveheart in the background. Because Scots, obviously. I didn’t make it, but I got close.

Because these minis were primed white I decided to start with a Brown Wash so there would be a little more definition and depth. Washes are like thin paint that runs off and collects in the cracks. When you wash, dab off any excess that overflows the edges, because otherwise it will dry as an ugly smudge.

Base coat time. Using my bigger brush I start blocking out all the basic color areas. Don’t glob too much on. And just like washes, wipe away your excess. Don’t worry if your base coat isn’t perfect and you color outside the lines. There are plenty of chances to fix that as you go.

Keep your brush moist. You only need a tiny bit of paint on the tip of the brush. Apply it to the mini gently (never mash your bristles). Then you need to dip your brush in water, swirl it around to clean the paint out, wipe it on a rag… and this next part is controversial… I lick my brushes back to a sharp point. (some people are worried their paint is going to give them cancer, but I’ve never actually heard of anybody getting cancer from mini painting, so I’m not particularly worried about it)
Never jab your brush all the way into the paint, because paint will get up inside the metal holding the bristles and dry there. When that happens the bristles will be forced outward, and you will no longer have a sharp tip. Congratulations, now you can use that brush for basing and dry brushing.
Once the basic colors I want are blocked in, now I go back and block in the smaller areas base coat.

If I was really going for speed I’d use fewer colors, and everybody would have the same skin tone and hair color. At this point the King of England had already reestablished Prima Nocte, so I was doubting I’d be able to reach my Braveheart Challenge goal, but what the heck. More colors makes for a better tutorial.
Some people like to start inside and work their way out. Other painters will concentrate on one color, taking it from base and through all of its shading before continuing onto the next color. Whatever works for you. Personally I kind of bounce between colors like a ping pong ball.
Once I’ve got everything base coated, I decided to put down another wash for definition between the edges and also to kind of even the whole mini out before going back to shade. In this case I used armor wash, which is a sort of off black/purple/grey. I don’t apply this to skin, just clothing, weapons, and armor.
While that wash on everything else is drying, now is a great time to get to the part that all newbie mini painters dread. Faces. And especially EYE BALLS. But don’t worry. There are probably more mini painting tutorials on eyes than anything else. Don’t worry. This is what your tiny brush is for. And you will create plenty of cross eyed and googly eyed minis before you figure it out. We all do. I look at the ones I was proud of from five years ago and cringe.
And if you really screw up an eye, you can just paint over it and try again. Or, cheat, and paint a scar over it (I’ll explain how scars, tats, and face paint works later). Or if you really hate painting faces but you want to war game, pick an army made of skeletons or people who wear helmets. J
I start by putting down a brown into the eye socket. On Caucasian skin tones I’ll unusually use a medium brown. On olive or African skin tones, a darker walnut brown. On vampires, orcs, etc, I go red. You can have a lot of fun with this. The purpose of the brown beneath is once you add the white of the eye ball, that creates a darker shade effect around the eye socket. And on lighter skin tones at table top distance the white can disappear into the flesh, so it gives you a little bit more depth.
Then go and put your white eye ball on top of that brown. If you get outside the lines, no biggie. That’s easy to fix.

Now go and put a dot in that white. Don’t use black. Black is too unnaturally dark and doesn’t look right. Various browns work the best, but I’ve had good luck with blues, greens, and greys. If you are painting sci-fi, nothing says scary robot person like bright unnatural teal.
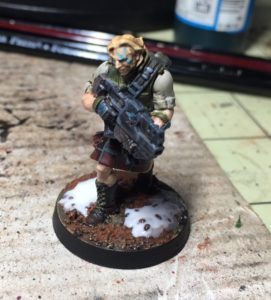
Do one side first. Then pause before doing the second. That way if you are off to one side, no biggie. Just put the second dot in the corresponding direction and he’s glancing to the side rather than cross eyed. You can see that’s what I did with the white haired guy (I started thinking of him as Geralt of Rivia).

A note on detail work, it is the same as precision shooting, everybody shakes. You might think your hands shake too much, but you’re probably fine. The key is getting your hands together however best suits you for the most stability. When I’m doing eyeball level detail, my hands are usually resting on the table.
A common problem with eyes is that you put too big of a dot, and you’re getting great big cartoon googly eyes, or a cat eye effect. First off, these are minis so people are going to be looking at them from eyeball distance, so the eyes being slightly off scale really isn’t that noticeable. (in fact, realistic proportion sculpts with realistic size eyes, and you probably wouldn’t actually even be able to see them at tabletop distance). It just looks way worse when you are looking at photos because on a screen they are blown up far larger than the actual mini.
But if you do get googly eyes, or there was too much under brown creating a raccoon effect, that’s an easy fix. Take your original flesh tone and make a line above and below the eye. So you’re putting a light coat across that brown you painted earlier. And then you’re undercutting below the eye. Basically you are tightening everything up.

So that’s eight eyes in like ten minutes. William Wallace is now on his Rampage of murderous revenge. And all of the eyes look pretty good except for the blond guy (I decided his name is Hamish) who has a little bit of a lazy eye, but honestly I didn’t even notice until I was looking at these blown up pictures.
So eyes done, the armor wash has dried on their clothes, so now let’s learn about shading and dry brushing.
If you just have a base coat, it makes your mini look flat. To add depth you want to put darker colors in the recesses and lighter colors where the light hits it. If you’re working with a limited number of paint colors, a little black added works for your shadows, and a little white works for your high lights. (there are tons of tutorials on this, because blending colors and shades is what separates the pros from the rest of us. Beyond the scope of the Braveheart challenge, but I love Two Brush Blending)
Dry brushing is a quick and easy way to add some highlights to edges of something. Get a brush that you don’t mind beating the crap out of for this. Dip the brush in the paint like normal. Then wipe the brush on a rag, removing most of the paint. Then drag the brush along the edge of what you want to highlight. It will leave paint only along the topmost edges.
In the above picture I’ve started shading the flak jackets with lighter greens and putting some dry brushing on the back packs.
Now I go and do some shading on the guns, and I dry brush green onto their boot laces. I hit the buckles on the straps with greys. I dry brush some blue/white onto the little armor pieces on their arms. Same with the hair, lighter tones brushed across the taller strands.

And now this is the part where I totally screwed my goal. Originally the kilts were just going to be crimson, shaded up with clear red. (I don’t like adding white to highlight red cloth because it looks too pink). But that looked boring, and tartans need stripes. So I googled William Wallace Tartan and went from there.
The key to painting patterns on clothing is that you don’t just slap the new color down on top of the original color. That looks unnatural. So instead mix a little bit of the original color in with the stripe color. So in this case I add some crimson to the black. (mixing colors is easy on a wet pallet).

Anywhere I screw up, I can always go back and hide it with the base color.
That was a lot of stripes and I’m running behind (Okay, I admit that I might have gotten sucked in and actually watched the big freedom monolog and ensuing battle) I could have stopped there and it would have been fine for table top purposes. But narrow white stripes within the black would make it really pop.

Same thing as before. Don’t go straight white. I mix a tiny bit of the black/crimson so it looks like its part of the same fabric.

Stripes done, I go back and put a flesh wash on the exposed skin. Since these are Scots, I’m trying to keep them pale, so it is just a water coat. Again, dab out the excess. And don’t let the flesh wash get into the eyes because it will make them turn pink. You can have a lot of fun experimenting with skin tones. I’m Reaper Olive Highlight.
After washing, you’ve darkened the skin a bit, so then go back with the original flesh tone you used to highlight. (these are Reaper Caucasian medium I think). Hit the tops of muscles, foreheads, tips of noses, cheek bones, etc. Anywhere the light would naturally fall.
If you really want to make a mini pop, there are tutorials for building up flesh tones starting with olive greens layered with reds. And you can also get red or olive lines into things like the crease of the nose.

I didn’t get into that much detail on these guys, because after all those stripes Wallace has been captured by the English and the end is nigh, but inspired by FREEDOM, let’s do some war faces.
Just like the tartan stripes, don’t just slap down a new color on skin. For tattoos, scars, etc. mix a little bit of the base flesh tone in with the new color. That will make it look more natural. Same principle applies to beard stubble. Take the hair color and mix it with skin tone until it is grey.
Because my William Wallace (though I think they actually modeled him on the Highlander) has a sword, and this is for a sci-fi game, I can get kind of creative with the colors rather than plain steel. There are tons of tutorials out there about how to paint steels, and many painters are devotees of NMM (Non Metal Metal).

Swords and weapons, the more you shade and highlight, the more they are going to pop.
The movie is over and I have failed, but let’s keep going. Earlier we talked about bases. You can just put a base coat and a dry brush over that and it will look great. But for this army (Ariadna for Infinity) all my bases are united by being a dusty Alabama looking red. So I bust out a little bit of rust pigment powder and spread it around with a garbage brush.
Pigments are beyond the scope of this tutorial, but think of them basically as paint in dust form. And don’t get it on your clothing because it is nasty stuff.

When painting bases, I like to get a little bit of road dust or mud onto their boots and clothing in places where it seems natural.
That’s it for a quick paint job. I spray them with matte sealer before doing the next step because I don’t want any plant life permanently sealed onto them.
This is unnecessary but a little bit of flocking adds a lot of life to a mini. Model train supplies are a great source for various grasses (they’re usually ground up sponge in various plant seasonal colors). Put down some white glue like you did with sand.

For this army I use a dried moss I picked up from Hobby Lobby.

And as you can see it makes a pretty neat effect for only a few minutes of effort.

So there you go. I hope new painters find that useful. I enjoyed the Braveheart Challenge.
http://www.dailymail.co.uk/news/article-4174882/PETA-demands-Games-Workshop-remove-fur-Warhammer.html
The %@$#?
Ah yes this article. I saw this before….. PETA is retarded.
PETA obviously have not read one lick of WM40k literature. Wearing the pelt of the mutant wolves is probably the least offensive thing Space Wolves does.
I used to paint Warhammer 40K many years ago. I still have some Space Marines, and Dark Eldar. I basically stopped because all my friends stopped playing, and GW made internet ordering of their product insanely hard. Plus the price increases were just too much for plastic models.
Oh, and I should mention that Magic: The Gathering kind of became my obsession after that. I still play, a lot. Your painting is quite good Larry. I was never that good.
Same, plus the game is unbalanced from my perspective (Tyranid player).
I lost to Tyrannids and Necrons a lot.
Might have changed since I last played. It was a few years ago. Then again the friend I played with frequently strong armed house rules that hurt swarming armies, so that might be another reason I quit.
Another friend got me into Warmachine so I am not all that interested in going back.
My daughter wanted me to ask you to paint a dragon for her. I suggested that perhaps we could instead try to paint one ourselves.
I mean, you’re welcome to paint one for her, but I’m not going to hold off buying your next book if you say no.
Nice article. Painting miniatures is also my thing, been doing it for a long, long-time. Very relaxing too, and I especially like doing conversions: reposing figures and or adding bits to trick them out.
So out of curiosity, will you be painting a Ma’aldrakar?
I know I have a ridiculous pile of minis coming when Bones3 ships.
dammit. Aint there anything I can do, that you don’t do better?
4 kickarse minis in the space of 3 hours!
Let’s see you paint THIS shade of green.
Army Painter makes hands-down the best spray primers I’ve ever used. They’re a bit on the pricey side ($15/can MSRP), and krylon comes close, but for models that I’ve spent $50-100 on the extra money for Army Painter is more than worth it. Plus, it comes in a variety of colors, and acts as a base coat.
Larry,
I see your depravity knows no lower limits. Painting figurines that very likely include the pelts of innocent bunnies and gophers. I insist you cease immediately and switch to environmentally friendly and sustainable PETA scalps.
Are you referring to that stupid complaint about the space wolves faction?
Apologies for an off-topic comment.
What do you do if you’re interested in getting into a game, but you don’t know anyone who plays or anyone who’s even interested in playing?
Find your local game shop that stocks miniature games, and ask them when they might have a group come in that is willing to teach you.
Go to your Local Game Store. They usually have different games on different nights. Most places will have somebody willing to show new people how to play. (because they are always looking for more people)
It’s been years (decades?) since I painted any models, and I was never any better than basic. Fav story, a friend once asked how I’d got “that great weathering effect” on some 1/300th scale Chieftains – that’s the old British MBT btw & not the leader of a warband – I blushed and said it was because the spray on matt varnish bubbled on application . . .
If I was starting out afresh, this would be pretty darn useful. Though more likely I’d go “Too hard man . . . ” There is after all I reason I was never better than basic. -blush-
Maybe wandering off topic though, but I suspect the ‘getting cancer from putting your miniatures brush in your mouth thing’ goes back to the days when ladies painting wrist watches would put the brush in their mouths to get a fine point and subsequently developed mouth tumours. They were painting on luminous watch faces using radium based paint. Health & Safety regulations, as we Brits refer to them, can be a PTA and Gods own gift to Jobswurfs everywhere, but . . . well there are reasons why Hatters aren’t mad anymore.
But meandering back on topic, those miniatures look awesome.
Still waiting for MHI-themed minis, boss. Reaper does Kickstarters, knowhatimsayin? Tap tap tap…
This is a terrific tutorial! Thanks, Larry. I have some Groo miniatures and you’ve inspired me to finally paint them.
Great article, but I would say one thing: When using a wet pallet don’t use wax paper, use parchment paper instead. Should be next to wax paper in the grocery store. Wax paper is not permeable, but parchment is, so it will keep your paints wet better.
Nice tutorial, Larry. Appreciate it. Still have a couple hundred Bones from the first Kickstarter that have never been used.
Got any tips for how to straighten out plastic minis, like the aforementioned Bones, that got a little skeewompus in packaging? I understand hot water can soften the plastic, but I’m not exactly sure how hot and how long to submerge it. I would definitely like to know how to straighten out the various swords and legs that are curling around in my boxes.
I use a hair dryer. Just heat them up until the bits you want to bend are malleable, then bend them back where you want them. A lot easier than messing with boiling water.
A tip on eyes. A trick I learned at the studio as both a time saver, and a way to avoid the cat-eye or wide-eye that sometimes happens when you paint the pupil into an eye, is to paint the entire eye the colour you want and then just put a white dot on the edges. Usually there are creases in the face that are recessed, and it makes it a bit easier to be precise at such a small scale. If you shake, you tend to shake towards the crease .. which stops the flow of paint.
My usual caveat : paint however you feel comfortable 🙂 I just found this to be a great tip for consistent eyes.
Gee whiz Larry, I wish I’d had this tutorial thirty years ago!
Not to counterdict Larry but this is an excellent starting point but read other people’s how-to’s and watch YouTube clips as well and develop a technique that you’re comfortable with. Personally IMHO the only right way is the way that works for you.
And funny, never licked my brushes. I lick my forefinger and thumb and then massage the tip into a good sharp point.
Speaking of geekly hobbies, do you ever watch Lindybeige’s product on YouTube?
In case you don’t know the baking soda trick – sift a little baking soda (a pinch between your fingers) into a thin coat of wet super glue. The glue will set instantly, the baking soda acts as a filler – think bondo – with a sandy surface. You can reapply glue and baking soda several times to build up, fill in, etc.
One thing I do differently is, after assembly, is to use some hot glue to put the mini on the top of a roofing nail. It gives me an easy handle to hold the mini with, rather than trying to grasp a large base. To keep them upright, I took some 1×2 lumber, cut it into 8 inch or so lengths and drilled holes a little bigger than the nails in rows down the lumber. I went all the way through rather than try to not punch through. I then glued a strip of cardboard from a 12 pack of sodas on the bottom. These make great stands to hold the minis while they are drying.
A couple of things:
1) For some reason, this post is not showing up on your timeline anymore. I had to find it through a link that I sent to my sons a couple of weeks ago. Weird.
2) Speaking of my sons–they are now completely jazzed about painting figurines. They read this post and immediately tracked me down and insisted on starting up this new hobby. We’re in the process of setting up a space in the basement, and have purchased some supplies at a local game shop. Pretty cool. And …
3) We discovered Pathfinder. I used to play AD&D when I was in high school and college, and have been missing it a lot lately. When we went to the game shop, I started asking about RPGs and what was the hot ticket these days. The shop keeper pointed me to PF, and that’s all she wrote. We start our first campaign this weekend.
Your reach and influence knows no bounds, Larry. Keep up the blogging. Who the hell knows what’ll happen next. I might even start writing again…. 🙂